
Introduction
Welcome to my article on how to connect solar panels to batteries! In this comprehensive guide, we’ll delve into the essential steps for harnessing solar energy efficiently. Whether you’re a DIY enthusiast or a curious learner, understanding the process of connecting solar panels to batteries is crucial. Let’s explore the benefits of this setup and discover how it plays a pivotal role in sustainable energy solutions.
In this article, we’ll cover everything from the basics to practical implementation. By the end, you’ll have the knowledge and confidence to set up your own solar panel system and power your devices with clean, renewable energy.
Now, let’s dive into the fundamental concepts.
Understanding the Basics Concepts
Solar Panels
A solar panel converts sunlight into electricity using photovoltaic (PV) cells. When sunlight hits these cells, it excites electrons, generating an electric current. Solar panels are made of silicon cells, and they can be grouped into arrays for homes or large systems for industrial use.
Batteries
Batteries store the electricity generated by solar panels for later use — especially when there’s no sunlight. Deep-cycle batteries are ideal for solar systems as they are built to handle frequent charge/discharge cycles. Options include lead-acid, AGM, Gel, and lithium-ion batteries.
Solar Charge Controllers
A solar charge controller is essential to regulate voltage and current from the solar panels to the batteries. It prevents overcharging and enhances battery lifespan. The two main types are:
-
PWM (Pulse Width Modulation) – simpler and more affordable.
-
MPPT (Maximum Power Point Tracking) – more efficient and ideal for larger systems.
Why Proper Connections Matter
Connecting solar panels to batteries correctly is essential for several reasons:
- Safety: Incorrect wiring can lead to electrical hazards or damage to components.
- Efficiency: Proper connections maximize energy transfer and prevent energy losses.
- Battery Lifespan: Well-maintained connections prolong battery life.
Stay tuned as we explore each step in detail. Let’s get started on our solar energy journey!
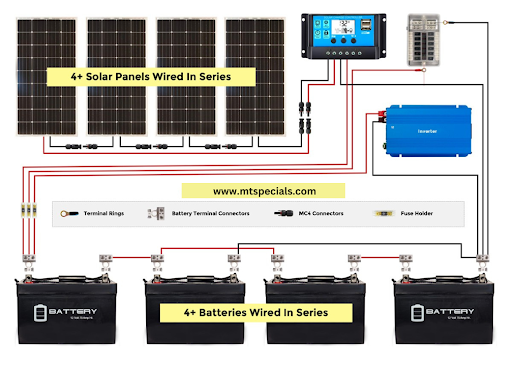
Types of Solar Setups
Understanding your setup type helps determine how to wire components properly.
-
Off-Grid Systems: Not connected to the utility grid. Relies on batteries for all energy needs.
-
Grid-Tied Systems with Battery Backup: Connected to the grid but stores excess energy in batteries.
-
Hybrid Systems: Combines solar, battery storage, and grid power for maximum flexibility.
Each type requires slightly different configurations for battery integration.
Necessary Materials and Tools
When setting up your solar panel-to-battery connection, having the right materials and tools is crucial. Let’s break it down:
Solar Panels
Solar panels are the heart of your system. They gather sunlight and use it to generate ELECTRIC energy. Choose panels with the appropriate wattage and efficiency for your energy needs.
Deep-Cycle Battery
A deep-cycle battery is designed for repeated charge and discharge cycles. It stores the energy generated by your solar panels, ensuring you have power even when the sun isn’t shining.
Solar Charge Controller
The charge controller manages the energy flow between the solar panels and the battery. It prevents overcharging and ensures optimal battery health.
Solar Panel Mount
A sturdy mount secures your solar panels in place. Proper mounting ensures maximum exposure to sunlight.
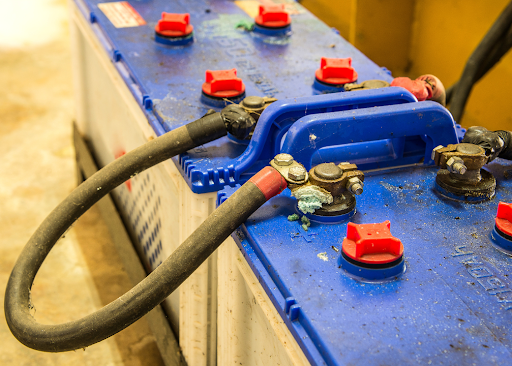
Battery Cables
High-quality battery cables connect the solar panels, charge controller, and battery. Use the right gauge and length to minimize energy losses.
Importance of Choosing the Right Battery Size and Type
Selecting the correct battery size and type is critical:
- Capacity: Consider your energy requirements. A larger battery capacity allows for more stored energy.
- Type: Deep-cycle lead-acid batteries are common for solar setups. Gel, AGM, or lithium-ion batteries are also options.
- Maintenance: Some batteries require regular maintenance (water refilling), while others are maintenance-free.
Remember, a well-chosen battery ensures reliable energy storage and system longevity.
To further enhance your understanding of solar systems, it’s important to learn about net metering and how it works with solar energy.
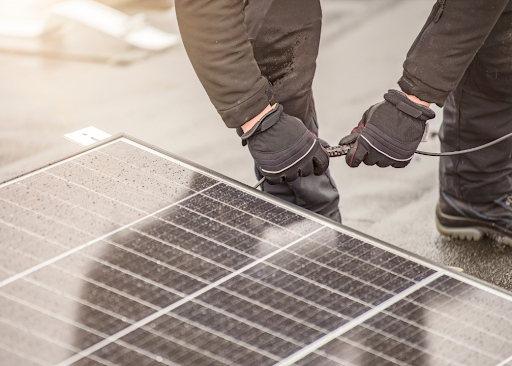
Wiring Diagram and Safety Precautions
Wiring Diagram
Here’s a simple wiring diagram to connect your solar panels to a battery via a charge controller:
- Attach the positive side of the solar panel to the positive terminal on the charge controller.
- Connect the negative end of the solar panel to the negative terminal on the charge controller.
- Connect the positive battery cable (with a fuse) to the positive battery terminal.
- Attach the negative battery terminal to the negative battery cable.
By following this diagram and safety precautions, you’ll successfully connect your solar panels to the battery, harnessing clean energy for your needs. Happy solar panel installation!
Making Battery Cables
Creating custom battery cables is a straightforward process that ensures efficient energy flow. Follow these steps:
- Cut Wires to the Desired Length:
- Measure and cut two pieces of wire to the appropriate length.
- Leave some extra length for flexibility and ease of installation.
- Attach a Fuse Holder:
- Use a fuse size calculator to determine the correct fuse rating for your system.
- Insert the fuse into the fuse holder.
- Connect one of the fuse holder’s wire leads to the shorter battery cable using a suitable wire connector (such as a butt splice connector).
- Secure the connection with heat shrink tubing and a heat gun.
- Crimp Terminal Connectors and Shrink-Wrap:
- Slide heat shrink tubing onto each battery cable before crimping the terminal connectors.
- Crimp the appropriate battery terminal connectors onto the battery cables (based on your battery type).
- Shrink-wrap the connections using the heat gun.
Your custom battery cables are now ready for installation!
Connecting the Battery to the Charge Controller
Follow these step-by-step instructions to ensure a successful connection:
- Attach the Negative Battery Cable:
- Attach the negative battery cable (without the fuse) to the “-” terminal on the charge controller.
- Ensure a secure connection.
- Attach the Positive Battery Cable (with the Fuse):
- Attach the positive battery cable (with the fuse) to the “+” terminal on the charge controller.
- Remember to follow the recommended order: connect the battery cables to the charge controller before connecting them to the battery.
By following these steps, you’ll have a reliable setup for connecting your solar panels to the battery. Happy solar energy journey!
Solar Panel Mounting and Final Steps
Mounting your solar panels securely is essential for optimal performance. Here’s what you need to know:
-
Choosing a Location:
-
Select a spot with full sunlight throughout the day.
-
Roof, ground, or pole mounting are all valid options.
Mount Types:
-
Roof Mounts: For permanent setups.
-
Ground Mounts: Easier to access and adjust.
-
Pole Mounts: Ideal for small or mobile installations.
Secure Installation:
-
Use stainless steel brackets to prevent rust.
-
Follow panel spacing and tilt angle recommendations.
-
Seal roof holes with waterproofing material.
Troubleshooting Tips
-
🔌 System not charging? Check polarity and fuse status.
-
🔋 Battery not holding charge? Test battery health and inspect for loose connections.
-
🌤️ Low energy output? Clean solar panels and check for shading or dirt.
-
⚠️ Controller flashing errors? Consult the user manual for fault codes.
-
If you’re exploring solar options locally, don’t miss our guide on how to discover the power of zonnepanelen in Roosendaal.
Conclusion
Congratulations! You now understand how to connect solar panels to batteries safely and effectively. By following these steps, you’re taking a big leap toward energy independence, lower electricity bills, and a greener future.
Take your time during setup, double-check all connections, and don’t hesitate to explore advanced solar system designs once you’ve mastered the basics. Let the sun power your life — one panel at a time!

Why Pneumatic Rotary Grippers Are Ideal for High-Speed Industrial Automation
Car Shipping Costs Explained: Factors You Should Know

What Happens If You Miss a Credit Card Payment?