What is a BMW G30 Android Screen Upgrade?
A BMW G30 Android screen upgrade is an aftermarket retrofit solution that replaces your vehicle’s factory-installed display with a modern Android-based unit. Unlike the original iDrive screen, which runs on BMW’s proprietary software, these replacement units operate on the Android operating system — giving you direct access to the Google Play Store, third-party navigation apps, and a fully customizable interface that the stock system was never built to support.
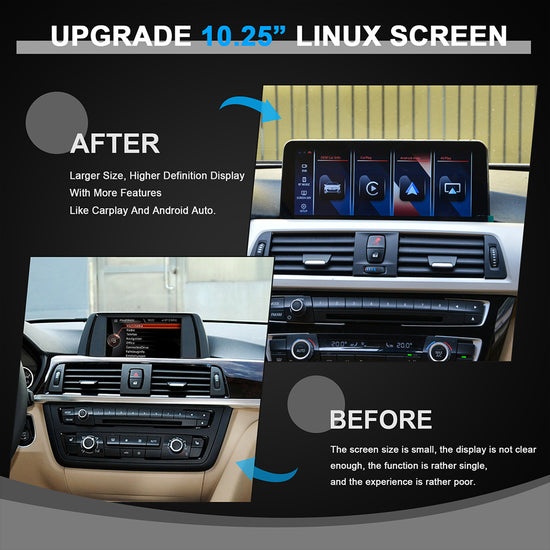
Most units designed for the G30 feature an ultra-thin screen profile, allowing them to sit flush within the factory dashboard cutout without requiring significant structural modification. The touchscreen interface responds with the kind of precision and speed you’d expect from a modern smartphone, a noticeable step up from the resistive or sluggish capacitive displays found in older iDrive generations. Visually, the upgrade also delivers sharper resolution and improved brightness, making the display easier to read in direct sunlight.
What separates a quality BMW Android screen from simply bolting in a generic tablet is deep vehicle integration. Purpose-built G30 units — such as those offered by PEMP Car Audio — connect directly to the car’s CAN bus system, preserving steering wheel controls, retaining parking sensor readouts, and maintaining climate display functions. This level of integration means the upgrade behaves less like an aftermarket addition and more like a factory-fitted evolution of the original system — delivering modern functionality without compromising the features BMW owners already rely on.
Key Benefits of Upgrading Your Infotainment System
The most immediate gain from a BMW G30 Android screen upgrade is seamless smartphone integration. Both Android Auto and CarPlay retrofit functionality come built into quality aftermarket units, meaning you can mirror your phone’s navigation, messaging, and music apps directly on the dashboard display. No more fumbling with mounts or relying on Bluetooth audio alone — the connection is wired, stable, and responsive from the moment you plug in.
Beyond connectivity, the difference in everyday usability is hard to overstate. Android-based units run on significantly faster processors than the original iDrive hardware, which translates to snappier menu responses, smoother scrolling, and near-instant app launches. The display quality also takes a meaningful leap forward, with higher resolution panels and better contrast ratios that make everything from map rendering to album artwork look noticeably sharper.
 The expanded functionality is where the upgrade truly earns its place. With full access to the Google Play Store, you can install dedicated navigation apps like Google Maps or Waze, stream music through Spotify or YouTube Music, and even use voice control through Google Assistant for hands-free operation. Real-time traffic updates, offline map downloads, and live weather overlays are all within reach — features the factory system either locked behind a subscription or couldn’t support at all. For BMW G30 owners who spend significant time on the road, these additions don’t just modernize the interior — they make every drive measurably more convenient and enjoyable.
Ensuring Compatibility: Is Your BMW G30 Ready?
Before purchasing an Android screen upgrade, confirming that your specific G30 variant will accept the new unit is essential. The BMW 5 Series G30 was produced from 2017 onward, and while most models within this generation are compatible with purpose-built Android retrofit units, the exact iDrive version your car carries plays a significant role in determining fitment and feature support. G30 models equipped with iDrive 6 or iDrive 7 are generally the most straightforward to upgrade, while earlier configurations may require additional adapters or have limited CAN bus integration.
Screen size also matters. The G30 shipped with either a 10.25-inch or 12.3-inch factory display depending on trim level and production year. Quality aftermarket units are sized to match these specific dimensions, so knowing which screen your car has ensures the replacement sits flush in the dashboard without gaps or fitment issues. A quick look at your current display — or a check of your original order specifications — will confirm which size applies to your vehicle.
Checking Your BMW’s Specifications
The most reliable way to verify compatibility is through your Vehicle Identification Number. Enter your VIN into BMW’s official parts lookup tool or a reputable aftermarket compatibility checker, and you’ll get a precise breakdown of your factory-installed hardware. Alternatively, navigate to your iDrive system settings, select “Vehicle Information,” and note the software version and head unit model listed there. This information tells you exactly which generation of iDrive you’re running.
Cross-reference these details against the compatibility list provided by your chosen screen manufacturer before placing an order. Most reputable suppliers publish model-year and iDrive-version compatibility tables on their product pages. If your G30 sits on the boundary between supported and unsupported configurations — for instance, a late 2016 production model registered in 2017 — contact the supplier directly with your VIN to get a definitive answer rather than assuming fitment based on the model year alone.
Step-by-Step Guide to Installing Your Android Screen Retrofit
Installing a BMW G30 Android screen retrofit is a manageable project for anyone comfortable with basic automotive disassembly, provided you work methodically and take the right precautions from the start. The process breaks down into four distinct phases: preparation, stock screen removal, new unit installation, and post-installation testing.
Tools and Preparation
Before touching the dashboard, gather everything you’ll need: a set of plastic trim removal pry tools, a T20 Torx screwdriver, a Phillips head screwdriver, and a trim panel clip remover. Avoid metal pry bars — they’ll scratch or crack the interior panels. Disconnect the negative battery terminal and leave it disconnected for at least 15 minutes before starting work. This prevents accidental short circuits and resets any residual electrical charge in the system. Work in a clean, well-lit space and keep a small container nearby to hold screws and clips so nothing gets lost.
Removal and Installation Process
Start by carefully prying off the trim surround around the factory screen using your plastic removal tools. Work around the perimeter gradually rather than forcing one corner — the clips release progressively and the panel will come free without damage. Once the surround is off, locate the mounting screws securing the head unit and remove them with your Torx screwdriver. Slide the factory unit forward gently, then disconnect the wiring harness connectors at the rear. Note which connector goes where before unplugging — a quick photo with your phone saves time during reassembly.
With the stock screen removed, connect the new Android unit’s wiring harness to the vehicle’s existing connectors. Quality retrofit kits, including those from PEMP Car Audio, include plug-and-play adapters that mate directly with the factory loom, eliminating the need for any wire splicing. Route the CAN bus cable to its designated port, connect the antenna lead, and attach any additional cables for the rear camera or steering wheel control interface. Slide the new unit into the dashboard cavity, confirm it sits flush, and secure it with the original mounting screws. Reattach the trim surround until all clips engage firmly.
Testing and Configuration
Reconnect the battery, then power on the system. The Android unit will boot through its initial setup sequence — follow the on-screen prompts to select your language, time zone, and display preferences. Calibrate the touchscreen if the setup wizard offers the option, as this ensures tap accuracy across the full display area. To activate Android Auto, connect your phone via the USB port and follow the pairing instructions on screen. For CarPlay retrofit setup, enable wireless or wired CarPlay through the unit’s settings menu and pair your iPhone accordingly. Test steering wheel controls, parking sensor overlays, and climate display readouts to confirm CAN bus integration is functioning correctly before closing up the dashboard permanently.
Troubleshooting Common Issues After Installation
Even a clean installation can surface a few hiccups once the system powers up. Screen flickering is usually traced back to a loose display connector — power down, reseat the cable firmly, and the issue typically resolves. If Android Auto or CarPlay drops connection intermittently, try a different USB cable before assuming a deeper fault, as cable quality makes a significant difference. Audio cutting out through the car’s speakers often points to an improperly seated CAN bus connector rather than a software problem. For persistent software glitches or a frozen interface, a factory reset through the unit’s settings menu clears most issues without affecting vehicle integration. If steering wheel controls or parking sensors stop responding after reset, re-flashing the unit’s firmware — available from the manufacturer’s support page — usually restores full functionality. When problems persist beyond these steps, consult a professional installer rather than continuing to troubleshoot blind.