The excitement of a new iOS update can quickly turn into frustration when your iPhone gets stuck on the dreaded “Update Requested” screen. This seemingly endless wait can be exasperating, but fear not—there are effective solutions to get your device back on track. In this comprehensive guide, we’ll explore various methods to resolve the iPhone stuck on “Update Requested” issue.
Method 1. Check Your Network First
Before diving into complex solutions, it’s essential to ensure that your iPhone has a stable and reliable internet connection. A poor or intermittent connection can cause the update process to linger on the “Update Requested” stage. Connect to a Wi-Fi network and ensure that it is stable. If you’re using cellular data, ensure you have a strong signal.
Method 2. Fix iPhone Stuck in Update Requested with TunesKit
TunesKit iOS System Recovery is a professional iOS system repair tool, and it is one of the most popular tools in recent years. It is capable of fixing over 150 kinds of iOS system problems like being stuck on the “Update Requested” screen, white Apple logo, black screen of death, iTunes errors, etc. More importantly, you can use it to fix your iOS device by yourself, with no need to worry about the data loss. Plus, the steps are quite simple, and the interface is friendly.
Here’s a general guide on using a TunesKit iOS System Recovery:
Step 1. Visit the official TunesKit website and download the iOS System Recovery tool. Install the software on your computer following the on-screen instructions. Open TunesKit iOS System Recovery on your computer after installation.
Step 2. Use a USB cable to connect your iPhone to the computer where TunesKit iOS System Recovery is installed. Select the Standard Repair, which won’t lose any data.
TunesKit iOS System Recovery will guide you through the necessary steps to initiate the repair process. This may involve entering DFU mode or recovery mode, depending on the specific requirements of the tool.
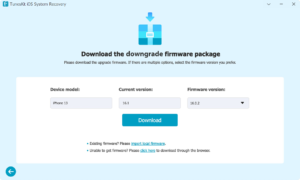
Step 3. The software will prompt you to download the corresponding firmware for your iPhone. Ensure that you have a stable internet connection during this process.
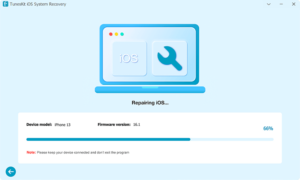
Step 4. Once the firmware is downloaded and verified, you can proceed to start the repair process. TunesKit iOS System Recovery will automatically fix the detected issues, including the “Update Requested” problem.
The repair process may take some time. Ensure that your iPhone remains connected to the computer throughout the entire process. After the repair is complete, check your iPhone to confirm whether the “Update Requested” issue has been resolved.
Method 3. Force Restart Your iPhone
If waiting for an extended period doesn’t resolve the issue, a force restart might do the trick. The steps to force restart vary depending on your iPhone model:
For iPhone 8 and later:
Press and release the Volume Up button, press and release the Volume Down button, and then press and hold the Side button until you see the Apple logo.
For iPhone 7 and 7 Plus:
Press and hold the Volume Down button and the Side button simultaneously until the Apple logo appears.
For iPhone 6s and earlier:
Press and hold the Home button and the Side (or Top) button simultaneously until you see the Apple logo.
Method 4. Check for Sufficient Storage
Insufficient storage space on your iPhone can impede the update process. Navigate to Settings > General > [Device] Storage to check your available storage. If it’s nearly full, consider deleting unnecessary apps, photos, or videos to free up space.
Method 5. Pause and Resume the Update
If your iPhone is still stuck on “Update Requested,” try pausing and then resuming the update. Navigate to Settings > General > Software Update, and tap on “Download and Install.” If the process doesn’t resume, you may need to cancel the update and start again.
Method 6. Reset Network Settings
Corrupted network settings can also contribute to update issues. Resetting your network settings can resolve these problems without affecting your data. To do this, go to Settings > General > Reset > Reset Network Settings. Keep in mind that this will erase saved Wi-Fi passwords and VPN settings.
Method 7. Update Using iTunes or Finder
If the over-the-air update isn’t working, try updating your iPhone using iTunes (on macOS Mojave and earlier) or Finder (on macOS Catalina and later) on a computer. Connect your iPhone to the computer, open iTunes or Finder, and choose your device. Click on “Check for Update” and follow the on-screen instructions to install the latest iOS version.
Method 8. Use Recovery Mode
If all else fails, you can try putting your iPhone in Recovery Mode and then updating it. This involves connecting your device to a computer, initiating Recovery Mode, and then restoring or updating through iTunes or Finder. Be cautious, as this will erase all data on your iPhone if you choose to restore.
For iPhone 8 and later:
- Connect your iPhone to your computer while iTunes or Finder is open.
- Force restart your iPhone by following the steps mentioned earlier.
- Release the buttons when you see the “Connect to iTunes” or recovery mode screen.
For iPhone 7 and 7 Plus:
- Connect your iPhone to your computer while iTunes or Finder is open.
- Force restart your iPhone.
- Release the buttons when you see the “Connect to iTunes” or recovery mode screen.
- For iPhone 6s and earlier:
- Connect your iPhone to your computer while iTunes or Finder is open.
- Force restart your iPhone.
- Release the buttons when you see the “Connect to iTunes” or recovery mode screen.
Method 9. Contact Apple Support
If none of the above methods resolve the issue, it’s time to seek help from Apple Support. They can provide personalized assistance based on the specific details of your situation. Visit the Apple Support website or make an appointment at an Apple Store or an authorized service provider.
Conclusion
Getting stuck on the “Update Requested” screen can be a frustrating experience, but with patience and the right approach, you can resolve the issue and enjoy the latest features and improvements offered by iOS updates. Start with the simpler solutions, such as checking your network and force restarting your device, and gradually move on to more advanced methods if necessary. Remember to back up your data before attempting any significant troubleshooting steps, and if all else fails, reach out to Apple Support for professional assistance.

How Sales Teams Increased Productivity with Parallel Dialers

Curtain Dry Cleaning and Leather Sofa Cleaning – Reliable Care by Duo Nini

Brian Ferdinand of EverForward Trading Joins Forbes Finance Council, Expanding His Voice on Markets and Risk

How Technology Is Changing Addiction Recovery in the Digital Age.

Our First Winter Trip to Aspen — And the Decision That Made It Stress-Free

How Technology Is Changing Addiction Recovery in the Digital Age.

Puzutask Com: Complete Guide, Reviews, and Login Information

Solve SMD Diodes Sourcing with Utsource's Bulk Options


