![How to Recover Deleted or Unsaved Word Document on Mac [2025]](https://thetechnotricks.net/wp-content/uploads/2025/02/Picture1-11.webp)
7 Ways to Recover Deleted or Recover Unsaved Word Document on Mac
You’ve spent countless hours working on an important Word document. But as you’re about to finish, your Mac freezes or MS Word crashes. When you reopen the app, your document is gone. You start to fear, thinking all your hard work is lost. But don’t stress.
You can reclaim an erased file or recover unsaved Word document on Mac, regardless of how you lost it. In this article, we’ll tell you why your Word file might have disappeared. We’ll also share how to find recovered documents in Word Mac whether they’re removed or unsaved with 7 helpful hacks. Let’s recover your work!
Part 1: Common Scenarios Leading to Lost Word Documents
Prior to understanding how to recover deleted/unsaved Word documents on Mac, you must know why you lost them in the first place. This is necessary to find the cure for the problem. Here are some reasons as to why you might lose Word files:
- Storage corruptionor failure – Storage devices can fail or become corrupted, causing data loss.
- Sudden crashes– MS Word may crash unexpectedly before you save your work
- By Accident – Simple mistakes, especially when distracted, can lead to losing files.
- Malware threats– Malicious viruses or malware can erase or hide Word files, posing a serious risk to your data.
- Physical damage– Severe hardware damage, like from accidents, can damage your storage device, resulting in losing Word files.
Part 2: How to Recover a Deleted Word Document on Mac?
Learning how to recover a closed Word document on Mac differs from how you would retrieve a file that’s been erased. In case, you’ve deleted your Word document, first look into the Trash. If you’ve emptied it, then, use a data recovery tool or a Time Machine backup. Here’s the procedure:
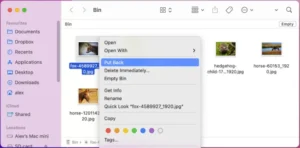
Option A: Check Your Mac Trash
Usually, when you erase a Word file by mistake or intentionally on a Mac it goes straight to the Trash. Unless you haven’t emptied it, the Trash will retain the file, until you can get it back or it’s removed automatically after 30 days. Here’s how:
Step 1: Open “Trash” from the “Dock.” Then, locate and pick the Word file you want to restore.
Step 2: Right-click the document. Next, choose “Put Back.”
Option B: Use a Mac Data Recovery Tool
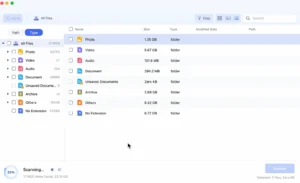
A specialized Mac data recovery application, 4DDiG Mac Data Recovery helps you get back lost Word files when the Trash has been emptied. But the file remains recoverable and is not overwritten. 4DDiG can retrieve your Word document from various data loss scenarios such as corruption, accidental removal, formatting, system crashes, and so on. But that’s not all. It offers various advantages such as:
- The app extracts Word files that cannot be found due to removal, virus contamination, or missing partitions.
- The software supports 2000+ different format recovery from MS Office applications and programs like Photoshop, Illustrator, and other applications.
- It provides both a preview for reclaimed files and an option to select your preferred file type from among various options.
- You can retrieve files from various internal/external storage devices with this tool.
- It can regain multiple files at once with a high recovery rate.
- It supports the latest Apple chipsets.
Here’s how to recover deleted Word documents on Mac with this tool:
Step 1: Execute this Mac Data Recovery tool on your Mac. Then, pick a storage device to scan where you lost your Word document. Select the file formats and tap “Scan.”

Step 2: Pause or stop the scan once you find your desired Word file. Preview it in “Documents” or by its path.
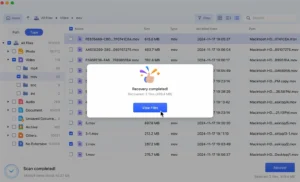
Step 3: Afterward, tap “Recover” to export it to a secure location on your Mac. Avoid restoring it to the same palace where it got erased.
https://www.youtube.com/watch?v=y9MFSRXjScA
Option C: Use the Time Machine Feature
If you’ve created a Time Machine backup of your Mac data including the Word file that’s been erased, you can get it back from the backup. Time Machine, a macOS-embedded utility stores any changes you’ve made since the last backup. Here’s how to recover deleted Word documents on Mac with Time Machine:
Step 1: Connect your disk that contains the Time Machine backup with your Mac.
Step 2: Then, click the Time Machine icon in the Mac menu. Pick “Enter Time Machine.”

Step 3: Use the timeline on the right to find the Word file. Select the file. Next, click “Restore.”
Part 3: How to Recover an Unsaved Word Document on Mac?
As we’ve mentioned earlier, you can lose Word files when a power outage triggers an unexpected crash of MS Word while you are working on an unsaved document. The file remains intact whenever this situation occurs though document accessibility might disappear post-incident. However, you can recover unsaved Word document on Mac through Terminal, its previous version, or AutoSave or AutoRecover features:
Option D: Check Temporary Files
Mac has a temporary folder where it stores files temporarily from where you can recover unsaved Word document on Mac through Terminal. This folder stores files created by the system and apps during use which are usually deleted automatically after the process ends or the system restarts. However, you won’t be able to find this folder without Terminal as it’s hidden in the directory. Following are instructions to recover unsaved Word document on Mac through Terminal:
Step 1: Open “Finder.” Then, head to “Applications.” Next, pick “Utilities.”
Step 2: Execute “Terminal.” Then, type the following command. Hit “Enter” afterward.
- open $TMPDIR(This is to access temporary files).
Step 3: Inspect the creation date or manually review Word files from the time of data loss to locate your desired document.
Step 4: Copy the file you need to another folder.
Option E: Check the AutoRecover Folder
The AutoRecover feature in MS Word saves your file automatically at set intervals (default is 10 minutes, but you can adjust it). You can use it to recover unsaved Word document on Mac. But you must’ve saved your Word file before the crash. Here’s how to recover a closed Word document on Mac with the AutoRecovery function:
Step 1: Open Microsoft Word. Then, head to “File.” Next, pick “Open.”
Step 2: Scroll through recent documents. Look for a file marked as “Document Recovery”
Step 3: Select the document. Then, tap “Open” to continue working or save it elsewhere.
Option F: Utilize the AutoSave Feature
If you want to know how to recover unsaved Word document Mac without AutoRecovery because you haven’t activated it, there’s another solution you can utilize. Real-time document saving is possible through an AutoSave feature that operates through cloud-based technology. It can retrieve files from locations that include OneDrive OneDrive for Business and SharePoint Online. Here’s how to recover unsaved Word document Mac without AutoRecovery and with AutoSave:
Step 1: Head to onedrive.com. Then, input your credentials. Log in to your Microsoft 365 or Microsoft account.
Step 2: Move to the “Recent” folder. Next, find your unsaved Word file. Select it. Click “Download.”
Option G: Recover Previous Version of Word
In case your Word file has been overwritten and you haven’t enabled AutoSave or AutoRecovery feature, try File History. But you must’ve enabled it prior to losing the file. File History, when activated stores various versions of a single Word document. So, you can restore the file to the version you want. Here’s how to recover unsaved Word document Mac without AutoRecovery with File History:
Step 1: Open the Word document you want to reclaim. Then, click “File” at the top. Next, select “Browse Version History.”
Step 2: A window will show all old versions. Pick the one you need. Tap “Restore.” Save the restored document to a new location on your Mac.
Part 4: Tips to Prevent Document Loss in the Future
After learning how to recover a closed Word document on Mac either unsaved or erased, the next step is to ascertain you don’t lose it again. For this, you’ll have to take certain measures such as the following:
- Enable AutoSave in Microsoft 365 to automatically save changes to OneDrive or SharePoint.
- Regularly save your document manually by pressing “Ctrl + S” while working or save your work in Google Docs.
- Think carefully before formatting a disk or partition, as improper repartitioning often leads to data loss.
- Always double-check before deleting or making major edits to your document.
- Keep copies of Word documents in cloud storage like OneDrive, Google Drive, or on an external drive.
- Working with the command line to delete Word documents requires careful attention since one mistake could wipe out many files from your system.
- Avoid automated cleanup or memory-boosting tools as they may erase files without warning.
- Enable Word’s Version History to find and restore older versions of your document in case of data loss.
- Make sure your device is charged or connected to power to avoid sudden shutdowns which could cause file corruption.
- Update Word and your computer’s system to prevent crashes or errors.
Conclusion
There are several ways to recover unsaved Word document on Mac or retrieve a deleted file. Check the Trash, use Time Machine backups, or rely on AutoRecover and AutoSave. If these options fail, a tool like 4DDiG Mac Data Recovery can reclaim lost, hidden, or corrupted files, even after accidental deletion, crashes, or virus attacks. With support for 2,000+ file types and a high success rate, it’s a solution that you would want for all your future Mac data recovery needs.

How Federal Assistance Programs Now Support More Than Their Original Purpose

How Email Widgets Can Support Time-Sensitive Email Marketing

Deepseekplay com: A Comprehensive Guide to Features and Benefits